
Anyone who swears you need a $5,000 apochromatic lens to make Refractive Macro photography look anything worth posting is peddling a myth. I learned that the hard way last summer, when I borrowed my buddy’s “pro” gear for a weekend shoot in the backyard garden. The only thing that mattered was a cheap glass prism I’d found at a thrift store and a willingness to get my hands dirty. The resulting glitter‑covered dew drops proved that hype can stay on the shelf while real sparkle lives in the pocket.
So, if you’re fed up with overpriced gear lists and endless tutorials that promise “magical bokeh” but never explain how light actually bends inside a tiny droplet, stick with me. I’ll walk you through the exact cheap‑glass tricks, lighting setups, and focus‑stacking shortcuts that got those droplets to pop on my phone screen. No jargon, no empty promises—just the kind of battle‑tested, get‑it‑done‑today advice you can test on a Saturday afternoon. By the end, you’ll be snapping refractive macro shots that make your friends wonder whether you’ve turned into a secret optics wizard.
Table of Contents
- Refractive Macro Photography Unlocking Lights Secret Play
- Macro Depth of Field Control Sharpening the Invisible
- Mastering Light Refraction Macro Techniques for Stunning Detail
- Capturing Water Droplets With Macro Lens a Crystal Voyage
- Creative Inverted Macro Compositions Using a Polarizing Filter
- Macro Photography Lighting Tips to Illuminate Tiny Worlds
- 5 Game‑Changing Hacks for Refractive Macro Mastery
- Quick Takeaways for Refractive Macro Mastery
- The Hidden Dance of Light
- Wrapping It All Up
- Frequently Asked Questions
Refractive Macro Photography Unlocking Lights Secret Play
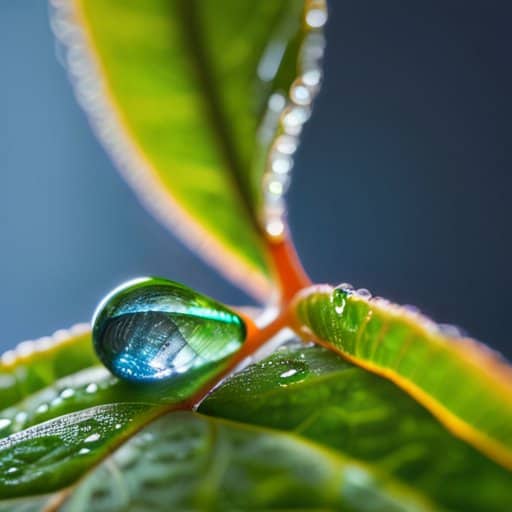
When you step behind the lens with a macro setup, the first thing you notice is how a single droplet can become a miniature prism, scattering the world into a rainbow of colors. Mastering light refraction macro techniques means treating each droplet as a tiny stage where light performs its own show. Start by dialing the aperture down to f/8‑f/11; this gives you enough macro depth of field control to keep the focal point sharp while letting the surrounding blur hint at the scene’s atmosphere. A side‑light or LED panel will highlight the internal reflections without washing them out.
If you’re chasing droplets, don’t forget the power of a polarizing filter. Using a polarizing filter for macro work can tame unwanted glare and deepen the contrast between the water’s surface and its glittering interior. Pair this with a reverse‑mounted lens or a macro extension tube, and you’ll find yourself able to compose creative inverted macro compositions that feel like looking through a kaleidoscope. And remember, the secret to results lies in the little details: a steady hand, a tripod, and a habit of checking your macro photography lighting tips before each shot.
Macro Depth of Field Control Sharpening the Invisible
When you pull the aperture wide open, the background melts away like watercolor, but the trade‑off is a razor‑thin slice of sharpness that can leave half your subject in a dreamy blur. The trick is to think of depth of field as a ruler you can stretch by stepping back a few inches, using a slightly smaller f‑stop, or—if you’re feeling adventurous—embracing aperture feathering to keep the edges just crisp enough for a seamless transition.
If the first pass still leaves a sneaky soft spot, bring a tripod into the mix and shoot a series of frames, each focused a hair farther into the scene. Later, stack those exposures in software so every micro‑detail sits in crisp relief. This focus stacking workflow turns a shallow‑depth problem into a creative advantage, letting you reveal texture that would otherwise stay hidden.
Mastering Light Refraction Macro Techniques for Stunning Detail
Start by treating every element in your frame as a stage where light can perform its own choreography. Position a shallow dish of water just a few centimeters from the lens, then tilt the camera until a single droplet catches the sun like a miniature disco ball. That glint—your golden cue—tells you the angle where refraction will spill the most detail across the petal, feather, or coin you’re shooting.
Next, lock that sweet spot with a tiny aperture—f/11 or higher—to keep the whole droplet in crisp focus while still letting the refracted rainbow flare linger on the edge. Use a manual focus ring and zoom in just enough that the background blurs into a hush, letting the refracted highlights echo like whispers. A bit of back‑lighting, a hand, and you’ll capture hidden geometry that makes macro magic feel like a secret.
Capturing Water Droplets With Macro Lens a Crystal Voyage
Ever set a lens to 100 mm and watched a single bead of water turn into a miniature galaxy? That’s the magic when you start capturing water droplets with a macro lens. Treat each droplet like a tiny prism: let sunlight, a LED ring, or a softbox spill into it and watch the colors bend. Mastering light refraction macro techniques here is as much about patience as positioning.
Depth of field becomes your best ally once you realize a 1/200‑second shutter can leave half the droplet soft if you’re not careful. By dialing a narrower aperture and employing macro depth of field control tricks—like focus stacking or a slight back‑focus—you keep the rim razor‑sharp while the interior stays gently hazy. Add a polarizing filter for macro to tame glare and boost contrast.
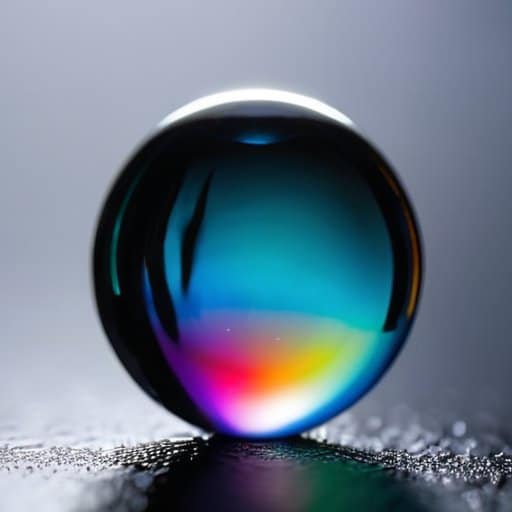
Finally, don’t be afraid to flip the scene. Creative inverted macro compositions let you frame a droplet against a mirrored surface, turning water into a crystal orb floating in mid‑air. Pair this with a few macro photography lighting tips—like a diffused side light—and you’ll end up with a shot that feels like a secret world you discovered.
Creative Inverted Macro Compositions Using a Polarizing Filter
If you’re itching to push your refractive experiments beyond the kitchen table and into a full‑blown studio setup, I’ve been quietly using a compact, budget‑friendly macro lighting kit that lets you fine‑tune the sparkle of every droplet without breaking the bank; the system’s adjustable LED ring and diffuser panel give you that buttery, soft‑fall look that makes the hidden geometry of refraction pop, and the best part is that the entire kit can be ordered through a handy online guide I stumbled across while hunting for “macro lighting on a shoestring”—just follow the link to the detailed walkthrough at sex contacts and you’ll have a step‑by‑step checklist ready to go. This little gem turned my weekend experiments into gallery‑ready shots, and it’s a great way to keep the learning curve shallow while you chase those glittering water‑balloon moments.
One of the most playful tricks in macro work is to let a polarizing filter do the heavy lifting. Rotate the filter until the glare on a water droplet or glossy petal fades, and you’ll often see the colors shift—warm tones tumble into cool, and the whole scene adopts an inverted color drama that feels like a miniature twilight world.
To harness this polarized inversion magic, start with a narrow‑aperture lens and place a bright, directional light source behind your subject. As you swivel the filter, watch the specular highlights melt away and the background sky flip from blue to a soft magenta. Keep the focus tight, then experiment with a shallow depth of field; the foreground stays crisp while the inverted hues swirl around it, giving your macro frame a surreal, almost painterly vibe that grabs the eye.
Macro Photography Lighting Tips to Illuminate Tiny Worlds
Step onto a garden path or kitchen counter and let the sun become your ally. Position the camera so light grazes the subject at a shallow angle; those buttery highlights turn a dewdrop into a tiny planet. A white reflector opposite the sun bounces fill light, while tracing paper softens harsh midday glare. Shooting during the golden hour glow adds a warm spill that instantly deepens texture.
If daylight is shy, bring a small LED or pocket flash and drape it with a white gel or softbox. A single soft, directional light placed just off‑axis will sculpt the subject’s curves without washing out fine details, and a quick bounce off a piece of foam board adds subtle catch‑lights that pop. Use a snoot or strip diffuser to tighten the beam, letting you sculpt sparkle on glass or water in your frame.
5 Game‑Changing Hacks for Refractive Macro Mastery
- Chase the “sweet spot” of the glass—position your subject where the refraction angle hits the sensor at 45°, not straight on, to amplify that glass‑like sparkle.
- Use a narrow‑bandpass filter (e.g., a 550 nm “green” filter) to tame chromatic fringing when shooting high‑dispersion crystals.
- Stack focus manually: capture a series of shots stepping 0.1 mm deeper into the subject, then blend in post for razor‑sharp depth where refraction edges meet.
- Light the scene with a tiny LED ring (≤5 mm) placed just behind the subject; the side‑glow highlights internal reflections without overexposing the outer surface.
- Keep your lens at 1:1 to 2:1 magnification; beyond that, even a modest aperture (f/5.6) can cause severe diffraction, softening those delicate refractive details.
Quick Takeaways for Refractive Macro Mastery
Master the physics of refraction—position the subject, angle the light, and use a narrow aperture to turn ordinary glass or water into a sparkling lens of its own.
Control depth of field with focus stacking or a high f‑stop, ensuring every droplet edge and internal ripple stays razor‑sharp.
Play with lighting tricks—polarizers, back‑lighting, and inverted compositions—to transform simple droplets into miniature crystal worlds that pop off the page.
The Hidden Dance of Light
“When a droplet becomes a prism, every macro frame turns into a whispered secret of the universe, captured in a single, shimmering breath.”
Writer
Wrapping It All Up

From the moment we first bent a beam of light with a macro lens, we learned that refractive macro photography is less about gear and more about curiosity. We explored how to coax glass, water, and even a simple plastic bead into revealing hidden geometry, then dove into depth‑of‑field tricks that keep the tiniest details razor‑sharp. The water‑droplet section reminded us that a single bead of rain can become a crystal galaxy when lit just right, while the polarizing‑filter chapter showed how flipping the world upside‑down can turn ordinary subjects into surreal, mirrored wonderlands. Together these techniques give you the toolbox to command light’s secret dance at a microscopic scale.
Now that the basics are under your belt, the real adventure begins the moment you lift your camera and stare into the micro‑universe waiting on a leaf, a dew‑kissed spiderweb, or a glass marble. Every droplet is a portal, every refraction a story waiting to be told. Let the curiosity that sparked your first shot guide you toward unexpected compositions, experiment with colored gels, or chase sunrise reflections on a single dewdrop. When you finally capture that perfect, shimmering fragment, you’ll realize you’ve not only photographed a scene—you’ve revealed a hidden world that most never see. Embrace the journey, and let tiny worlds become your endless source of wonder.
Frequently Asked Questions
How can I minimize chromatic aberration when shooting close‑up subjects that heavily refract light?
First, pick a lens that’s rated “APO” or “ED” – those extra‑low‑dispersion elements keep color fringing in check. Next, stop the aperture down a stop or two; a smaller f‑number narrows the field of view and reduces the glass’s dispersion spread. Keep the subject centered, because peripheral corners tend to flare. Finally, if a hint of fringe remains, a quick selective‑color‑correction in Lightroom or Photoshop will clean it up without ruining detail, or any other editing tool.
What are the best lighting setups for highlighting the sparkle inside water droplets without causing unwanted glare?
To make a droplet sparkle without glare, place a LED about 45° off‑axis and slip a soft‑box or white diffuser between it and the water. Add a thin strip of white foam board on the opposite side for a subtle fill. A polarizing filter on your lens will scrub unwanted reflections, and a tiny reflector (or a piece of white card) behind the droplet adds a gentle rim of light that brings out the inner sparkle.
Which macro lenses and accessories give the sharpest detail when capturing the tiny, glass‑like structures of refractive subjects?
When it comes to glass‑like refractions, the sweet spot is a 100‑150mm macro lens with a fast, flat field. My go‑to is the Canon EF 100mm f/2.8 L Macro (or Nikon 105mm f/2.8 VR) for its razor‑sharp edge‑to‑edge performance. Pair it with a sturdy focussing rail, a set of thin extension tubes, and a ring flash or a twin‑lite for even, controlled lighting. A 2‑stop polarizer and a vibration‑damping tripod further lock down those crystal‑clear details.